
티스토리 뷰
커스텀 에디터
커스텀 에디터 스크립트를 공부하며 다양한 GUI 기능을 기록하려한다.
우선 EditorGUI는 기본 자료형들을 포함한 이미지, 열거형, 레이아웃, 태그, 색상, 그라데이션, 텍스트, 텍스트 공간, 빈공간, 슬라이더 등 다양한 GUI를 제공해준다.
사용자는 이를 필요에 따라 병렬처리, 분살 등 디자인을 변경하며 사용할 수 있다.
상속
커스텀 에디터를 사용하기 위해서는 UnityEditor.Editor를 상속받은 스크립트를 생성해야한다.
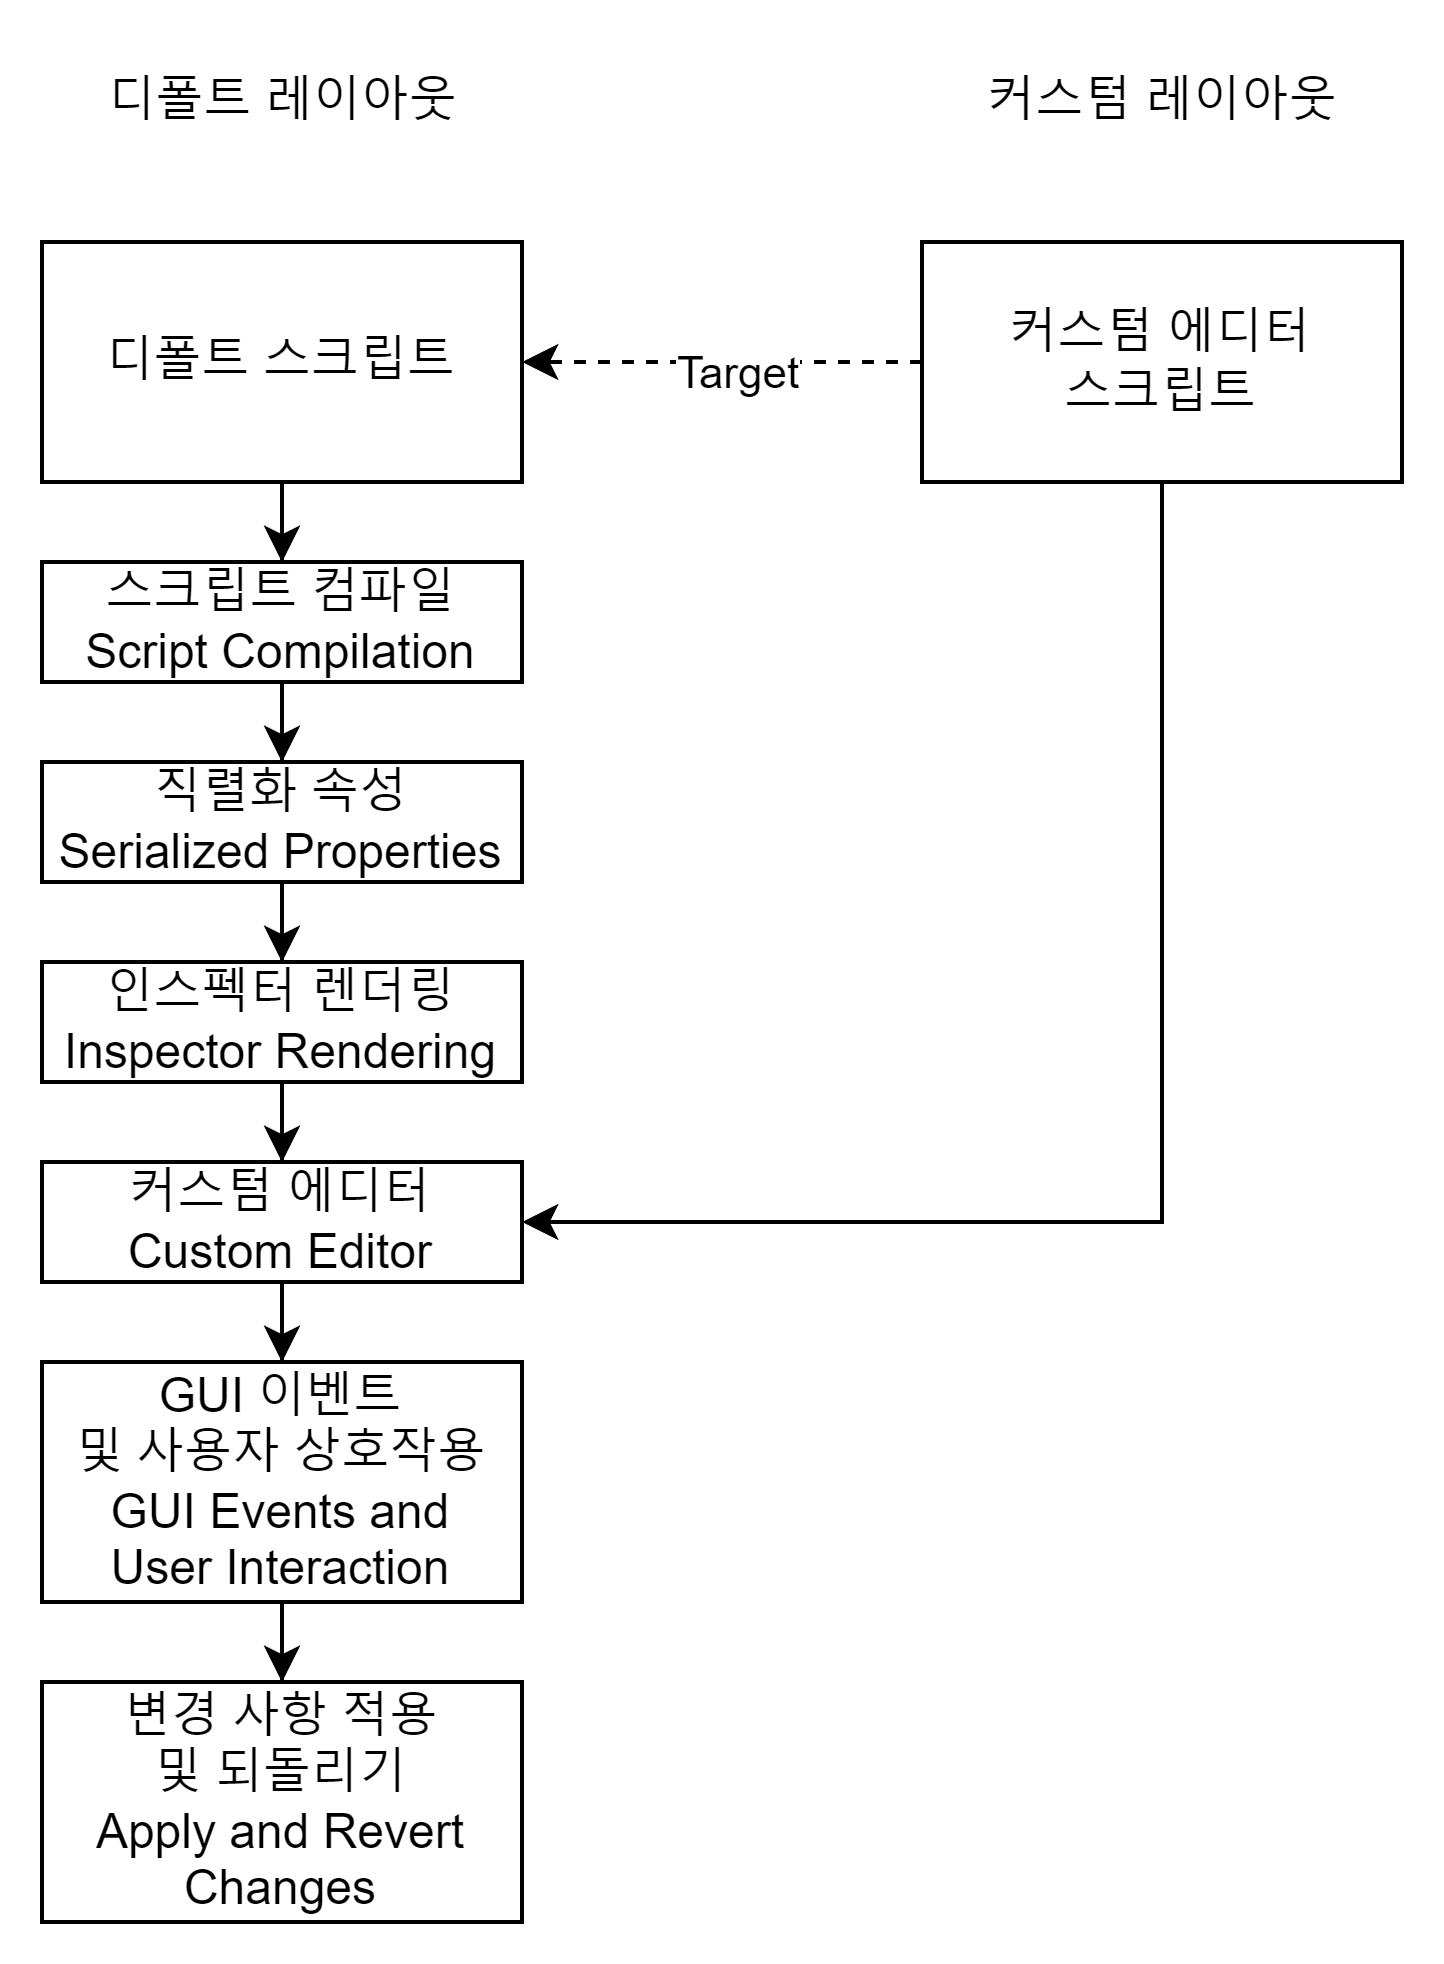
커스텀 에디터는 이 디폴트 레이아웃을 사용자가 선택하는 에디터 컨트롤로 대체하는 별도의 스크립트이다.
커스텀 에디터는 위 언급과 같이 다른 레이아웃을 대처하기에 대처할 대상 스크립트를 설정해주어야한다.
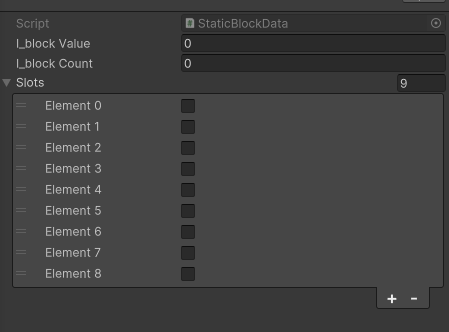
디폴트 스크립트 레이아웃 예제
using UnityEngine;

namespace Scriptable
{
    [CreateAssetMenu(fileName = "Block", menuName = "Scriptable/Data")]
    public class StaticBlockData : ScriptableObject
    {
        public int i_blockValue = 0;
        public int i_blockCount = 0;
        public bool[] slots = new bool[9];
    }
}
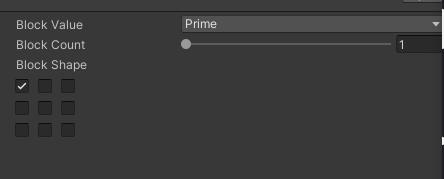
커스텀 에디터 연결 후 스크립트 레이아웃 예제
using Scriptable;
using UnityEditor;
using UnityEngine;

namespace FACustomEditor
{
    // Custom Editor targets "StaticBlockData" script
    [CustomEditor(typeof(StaticBlockData))]
    // Inheritant UnityEditor.Editor script
    public class BlockShapeCustomEditor : Editor
    {
        /// <summary>
        /// Drawing GUI on inspector mode
        /// </summary>
        public override void OnInspectorGUI()
        {
            // Define current target script data
            StaticBlockData blockData = (StaticBlockData)target;


            // Create enum popup inspector GUI
            blockData.blockValue = (BlockValue)EditorGUILayout.EnumPopup("Block Value", blockData.blockValue);
            // Create int slider inspector GUI
            blockData.blockCount = EditorGUILayout.IntSlider("Block Count", blockData.blockCount, 1, 9);


            // Create a label for the boolean field
            EditorGUILayout.LabelField("Block Shape");

            // Start a horizontal layout group
            EditorGUILayout.BeginHorizontal();

            // Create a boolean field
            for (int k = 0; k < blockData.blockSlots.Length; k++)
            {
                // Change line in every 3 toggle creation
                if (k % 3 == 0)
                {
                    EditorGUILayout.EndHorizontal();
                    EditorGUILayout.BeginVertical();
                    EditorGUILayout.EndVertical();
                    EditorGUILayout.BeginHorizontal();
                }
                // Create toggle inspector GUI with maximum width size (By setting maximum width size GUI can trim the space between each elements)
                blockData.blockSlots[k] = EditorGUILayout.Toggle(blockData.blockSlots[k], GUILayout.MaxWidth(20));
            }

            // End the horizontal layout group
            // Can repeat the above lines for other boolean fields if needed
            EditorGUILayout.EndHorizontal();

            // Send true signal when changes happen on GUI
            if (GUI.changed)
            {
                // Dirty save when every the elements in "StaticBlockData" has changed
                // Save the change progress in driver
                EditorUtility.SetDirty(blockData);
            }
        }
    }
}
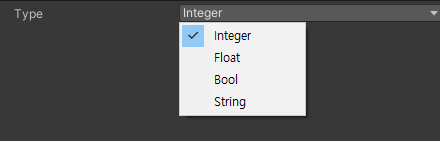
EditorGUILayout.Popup
- 팝업 메뉴를 생성하는 자료형이다.
- Popup 메뉴는 GUIContent나 문자열 배열을 목록으로 출력한다.
- Popup 메뉴는 선택된 값의 배열 위치를 반환한다.
- 예제 목록들을 선택시 반환되는 값들
- Integer 선택시 0 반환
- Float 선택시 1 반환
- Bool 선택시 2 반환
- String 선택시 3 반환
- 예제 목록들을 선택시 반환되는 값들
private string[] Type = { "Integer", "Float", "Bool", "String" };
private int type = 0;

public override void OnInspectorGUI()
{
    type = EditorGUILayout.Popup("Type", type, Type); //int
}
EditorGUILayout.EnumPopup
- EnumPopup은 일반 Popup과 달리 열거형을 타겟으로 팝업창을 생성한다.
- EnumPopup의 특징은 Nothing, Everything이라는 추가 옵션이 들어가있다.
- Nothing : 아무 속성도 선택하지 않는다.
- Everything : 모든 속성을 선택한다.
private enum Alphabet { Alpha = 1, Bravo = 2, Chile = 4, Delta = 8 }
private Alphabet alphabet = Alphabet.Alpha;

public override void OnInspectorGUI()
{
    alphabet = (Alphabet)EditorGUILayout.EnumFlagsField("Alphabet", alphabet);
}
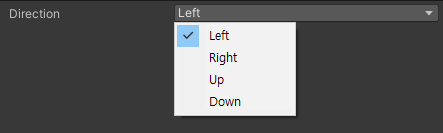
EditorGUILayout.EnumFlagsField
- EnumFlagsField는 EnumPopup과 동일하게 열거형을 기준으로 팝업창 목록을 생성한다.
- 단, EnumFlagsField는 하나의 속성만 선택이 가능하다.
private enum Direction { Left, Right, Up, Down }
private Direction direction = Direction.Left;

public override void OnInspectorGUI()
{
    direction = (Direction)EditorGUILayout.EnumPopup("Direction", direction);
}
EditorGUILayout.Toggle
EditorGUILayout.ToggleLeft
- 토글은 boolean 값을 반환하는 체크박스이다.
- Toggle은 명칭 뒤 일정 간격을 두고 생성된다.
- ToggleLeft는 명칭 앞에 토글이 생성된다.
public override void OnInspectorGUI()
{
    bool boolValue = EditorGUILayout.Toggle("Toggle", false);
    bool boolValue_Left = EditorGUILayout.ToggleLeft("Toggle Left", false);
}
EditorGUILayout.ToggleGroup
- ToggleGroup은 여러 토글들을 하나의 그룹으로 묶어 동시 처리를 하는 메뉴이다.
- 그룹 내의 각 토글들은 따로 boolean 값을 처리한다.
- 그룹 토글은 boolean 값을 통해 내부 모든 값의 활성화/비활성화를 업데이트한다.
bool[] pos = new bool[3] { true, true, true };
bool posGroupEnabled = true;

/// <summary>
/// Drawing GUI on inspector mode
/// </summary>
public override void OnInspectorGUI()
{
    posGroupEnabled = EditorGUILayout.BeginToggleGroup("Align position", posGroupEnabled);
    pos[0] = EditorGUILayout.Toggle("x", pos[0]);
    pos[1] = EditorGUILayout.Toggle("y", pos[1]);
    pos[2] = EditorGUILayout.Toggle("z", pos[2]);
    EditorGUILayout.EndToggleGroup();
}
EditorGUILayout.Foldout
- Foldout은 접는 글을 의미한다.
- 다른 메뉴들을 실시간으로 생성/감추기를 할 수 있다.
private void OnGUI () {
    //Value, Label, ToggleOnLabelClick
    isExpanded = EditorGUILayout.Foldout(변수, "GameObject Picker", true); //bool

    if (isExpanded)
    {
        intValue = EditorGUILayout.IntSlider("Int", 0, 0, 100);
    }
}
EditorGUILayout.TextField
EditorGUILayout.TextArea
- TextField와 TextArea는 문자열을 입력 받는 메뉴이다.
- TextField는 필드의 이름을 설정하고 문자를 입력할 수 있는 칸이 오른편에 생긴다.
- TextArea는 문자를 입력 받는 입력창이 생성된다.
private void OnGUI ()
{
    stringValue = EditorGUILayout.TextField ("Text Field", stringValue);
    stringValue_Area = EditorGUILayout.TextArea (stringValue_Area);
}
EditorGUILayout.Slider
EditorGUILayout.IntSlider
- Slider 메뉴는 읽는 그대로 슬라이더 메뉴를 생성한다.
- intSlider는 정수 범위의 슬라이더를 생성한다.
- Slider는 실수 범위의 슬라이더를 생성한다.
private void OnGUI () {
    intValue = EditorGUILayout.IntSlider ("Int", intValue, 0, 100);
    floatValue = EditorGUILayout.Slider ("Float", floatValue, 0f, 1f);
}
EditorGUILayout.Space
- Space는 두 메뉴 사이의 공간 여백을 생성한다.
private void OnGUI ()
{
    longValue = EditorGUILayout.LongField ("Long", longValue);

    GUILayout.Space (50);

    floatValue = EditorGUILayout.FloatField ("Float", floatValue);
}
EditorGUILayout.ColorField
EditorGUILayout.GradientField
- 색상 값을 반환할 수 있는 레이아웃 메뉴이다.
- GradientField는 초기 할당이 필요하며 값이 null일 경우 예외가 발생한다.
- ColorField는 오버로딩으로 컬러 픽커, 알파값 표시 여부, HDR 여부 설정이 가능하다.
Color color = Color.white;
Color colorHDR = Color.white;
Gradient gradient = new Gradient();

public override void OnInspectorGUI()
{
    color = EditorGUILayout.ColorField("Color", color); //Color
    colorHDR = EditorGUILayout.ColorField(new GUIContent("Color"), colorHDR, true, true, true); //ColorPicker, Alpha, HDR
    gradient = EditorGUILayout.GradientField("Gradient", gradient); //Gradient
}
EditorGUILayout.ObjectField
- Unity.Object로 지정가능한 모든 필드, 에셋을 넣을 수 있는 입력창을 생성한다.
- 파라미터의 allowSceneObject를 true로 세팅하면 씬 오브젝트도 지정 가능하다.
GameObject gameObject = new GameObject();

public override void OnInspectorGUI()
{
    gameObject = EditorGUILayout.ObjectField("Game Object", gameObject, typeof(GameObject), true) as GameObject;
}
EditorGUILayout.Begin(Horizontal, Vertical)
EditorGUILayout.End(Horizontal, Vertical)
- Begin(Horizontal, Vertical), End(Horizontal, Vertical)는 병렬/행렬 정렬을 설정하기 위한 레이아웃 설정이다.
public override void OnInspectorGUI()
{
    // Create a boolean field
    for (int k = 0; k < 9; k++)
    {
        // Change line in every 3 toggle creation
        if (k % 3 == 0)
        {
            EditorGUILayout.EndHorizontal();
            EditorGUILayout.BeginVertical();
            EditorGUILayout.EndVertical();
            EditorGUILayout.BeginHorizontal();
        }

        // Create toggle inspector GUI with maximum width size (By setting maximum width size GUI can trim the space between each elements)
        blockData.blockSlots[k] = EditorGUILayout.Toggle(blockData.blockSlots[k], GUILayout.MaxWidth(20));
    }
}
EditorGUILayout.Vector(2, 3, 4)Field
- Vector 값을 입력 받을 수 있는 레이아웃
UnityEngine.Vector2 vector2 = new UnityEngine.Vector2();
UnityEngine.Vector3 vector3 = new UnityEngine.Vector3();
UnityEngine.Vector4 vector4 = new UnityEngine.Vector4();

/// <summary>
/// Drawing GUI on inspector mode
/// </summary>
public override void OnInspectorGUI()
{
    vector2 = EditorGUILayout.Vector2Field("Vector2", vector2);
    vector3 = EditorGUILayout.Vector3Field("Vector3", vector3);
    vector4 = EditorGUILayout.Vector4Field("Vector4", vector4);
}
EditorGUILayout.(Int, Long, Float, Double)Field
- 기본 자료형의 값을 입력 받는 레이아웃 메뉴
int intValue = 0;
long longValue = 0;
float floatValue = 0;
double doubleValue = 0;

public override void OnInspectorGUI()
{
    intValue = EditorGUILayout.IntField("Int", intValue);
    longValue = EditorGUILayout.LongField("Long", longValue);
    floatValue = EditorGUILayout.FloatField("Float", floatValue);
    doubleValue = EditorGUILayout.DoubleField("Double", doubleValue);
}
EditorGUILayout.Label
- 인스펙터에 제목글을 작성하는 레이아웃 메뉴

EditorGUILayout.PasswordField
- 입력 받는 문자를 '*'로 표시하는 레이아웃이다.
string password = "";

public override void OnInspectorGUI()
{
    password = EditorGUILayout.PasswordField("Password", password); //string
}
EditorGUILayout.Layer
EditorGUILayout.Tag
- Layer와 Tag는 개발자가 프로젝트에 설정한 Layer와 Tag를 목록으로 출력하는 것이다.
- Layer는 기본적으로 int형을 반환하지만 LayerMask와
int layer = 0;
LayerMask layerMask = 0;
string tag = string.Empty;

public override void OnInspectorGUI()
{
    layer = EditorGUILayout.LayerField("Layer", layer); //LayerMask layer
    layerMask = EditorGUILayout.LayerField("Layer", layerMask); //LayerMask layer
    tag = EditorGUILayout.TagField("Tag", tag); //string
}
EditorGUILayout.HelpBox
- HelpBox는 아이콘과 더불어 다양한 문구를 표현한다.
EditorGUILayout.HelpBox ("Wraning", MessageType.Warning);
EditorGUILayout.HelpBox ("Info", MessageType.Info);
EditorGUILayout.HelpBox ("Error", MessageType.Error);
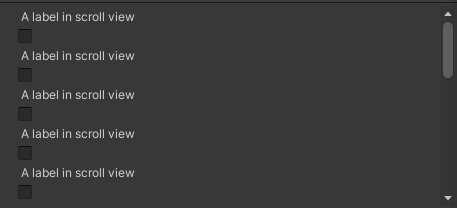
EditorGUILayout.BeginScrollView
EditorGUILayout.EndScrollView
- 각종 레이아웃을 스크롤로 일정 범위 내에 표현하는 레이아웃이다.
private UnityEngine.Vector2 scrollPosition;
private bool boo = false;

public override void OnInspectorGUI()
{
    scrollPosition = EditorGUILayout.BeginScrollView(scrollPosition, GUILayout.ExpandWidth(true), GUILayout.Height(200));

    for (int i = 0; i < 20; i++)
    {
        GUILayout.Label("A label in scroll view");
        boo = EditorGUILayout.Toggle(boo, GUILayout.MaxWidth(20));
    }

    EditorGUILayout.EndScrollView();
}
참고자료
유니티 - CustomEditor 활용 (Inspector 꾸미기)
유니티에서 아이템이나 무기 등의 설정값으로 ScriptableObject를 사용하면서 해당 아이템이나 무기 등의 이미지를 상단에 표시해 주는 기능을 CustomEditor를 이용해 꾸며 보겠습니다. (아래 이미지 참
geojun.tistory.com
[Unity] EditorGUI 및 EditorGUILayout
EditorGUI (EditorGUILayout) 시리즈는 int, float, bool, string 등 여러 값들을 설정하기 위한 ...
blog.naver.com
'개발 > Unity' 카테고리의 다른 글
| [Unity] 🧙♂️ God Object (0) | 2025.05.21 |
|---|---|
| [Unity] 유니티 최적화 체크 리스트 (0) | 2025.05.15 |
| [Unity] 사용하지 않는 리소스의 메모리 관리 (0) | 2024.05.10 |
| [Unity] SOLID 원칙과 게임 개발 (1) | 2024.03.31 |
| [Unity] 인스펙터 레이아웃 생성 과정 (0) | 2023.09.03 |